Perkins2806柴油發(fā)電機(jī)水泵的拆裝維修技術(shù)
Perkins2806柴油發(fā)電機(jī)水泵的拆裝維修技術(shù)

Coolant pump
To remove and to fit
To remove
Drain the coolant from the engine into a suitable container for storage or disposal.
2 Remove the thermostat housing, Operation 2-0.
Remove the oil cooler, Operation 2-9.
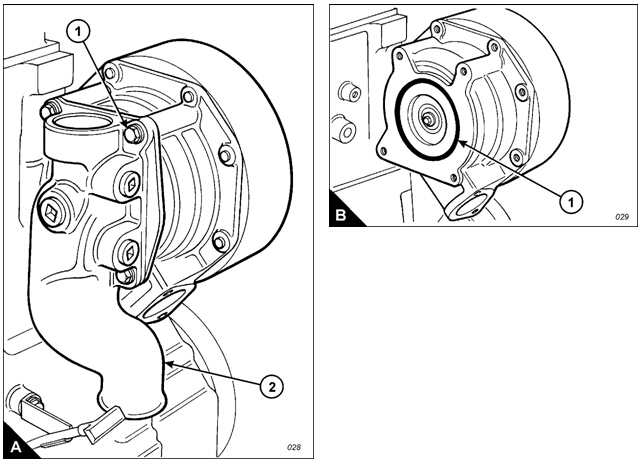
4 Remove four bolts (A) and the elbow (A2).
Operat ion 2-

5 Check the condition of the ‘O’ ring seal (B), discard the seal if it is worn or damaged. Remove the bolts
from the gear case cover and the coolant pump and remove the coolant pump.
To fit
Fit the coolant pump to the gear case, ensure that the gear engages correctly. Tighten the bolts.
2 If necessary, fit a new ‘O’ ring seal (B). Fit the elbow (A2) and retain with four bolts (A).
Fit the oil cooler, Operation 2-9.
4 Fit the thermostat housing, Operation 2-0.
5 Fill the coolant system to the correct level with the specified coolant mixture. Refer to the User’s Handbook
for the correct procedure.

![]()
![]() 2
2
2800
To dismantle and to assemble
Operation 2
Notes:
l The coolant pump seal can be renewed without removal of the coolant pump from the engine.
l Intermittent leakage of a small amount of coolant from the hole in the c oolant pump housing is not an
indication of a coolant pump seal failure. This is required to provide lubrication for the seal. Renew the
coolant pump seal only if a large amount of leakage or a constant flow of coolant is observed draining from
the c oolant pump housing.
l Service exc hange coolant pumps can be obtained from your Perkins dealer.
To dismantle
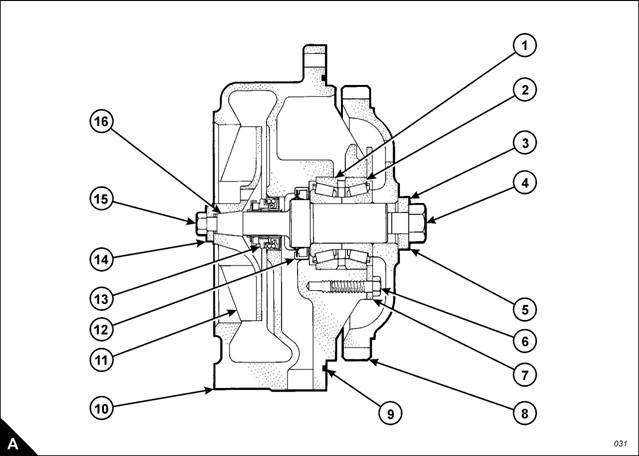
Remove the bolt (A5) and washer (A4). Use a suitable puller to remove the impeller (A) from the shaft
(A6). Ensure that the impeller does not become damaged during this operation.
2 Remove the spring and seal (A) from the shaft.
Note: The coolant pumps of certain engines may not have a spring fitted at this position.
Remove the four bolts (A6) from the retainer (A7) and remove the ‘O’ ring seal (A9) from the housing (A0).
4 Remove the gear and shaft assembly (A8). Remove the bolt (A4) and retainers (A and A7) from the shaft
assembly.
5 Use a press to remove the shaft (A6) from the gear. Remove the bearing (A), the spacer if fitted, and
second bearing (A2) from the shaft.
6 Remove the lip-type seal (A2) from the housing.

![]() 2800
2800
To assemble
Ensure that the shaft and the seal counter bore in the pump housing are clean.
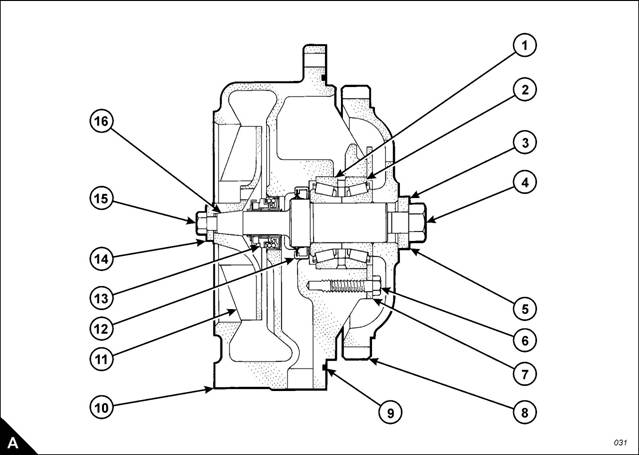
2 Fit the bearing (A), the spacer if relevant, and the second bearing (A2) to the shaft (A6).
2
Fit the retainer (A7) and gear (A8) to the shaft assembly. Fit the second retainer (A) and the bolt (A4).
4 Fit a new lip-type seal (A2) into the housing (A0). The seal must be fitted with the lip toward the inside of
the housing. Apply a small amount of clean engine oil to the lip of the seal.
5 Fit a new ‘O’ ring seal (A9) to the housing.
6 Install the gear and s haft as sembly in the housing. Fit the bolts (A6) which hold the retainer (A7) to the
housing.
Caution: Do not allow grease or oil to contact the faces of the seal. Do not stretch the seal during installation.
Note: The carbon seal assembly (A) must rotate with the coolant pump shaft when it is installed. Use clean
water as a lubricant for assistance during installation.
7 Separate the spring from the seal assembly (A). Use hand pressure to install the seal on the shaft (A6).
Push the seal onto the shaft until the seal faces make light contact. Fit the spring to the shaft.
8 Fit the impeller (A) to the shaft and retain with the washer (A4) and bolt (A5). Tighten the bolt to a torque
of 9 +/- Nm (28 +/- 2 lbf ft).
9 Fit the coolant pump, Operation 2-. 珀金斯ulpk0034活塞,鄭州沃爾沃柴油機(jī)配件,鄭州沃爾沃發(fā)電機(jī)配件,鄭州經(jīng)營珀金斯發(fā)動(dòng)機(jī)配件,河北 林德帕金斯 起動(dòng)機(jī),帕金斯柴油發(fā)電機(jī)組配件,大宇發(fā)電機(jī)組配件,帕金斯1004發(fā)動(dòng)機(jī)柴油慮清器,沃爾沃TAD1242柴油機(jī)配件,東營威爾信發(fā)電機(jī)組配件,帕金斯飛輪殼配件部